moldybluecheesecurds 2

Sunday, September 20, 2020

Setting up a used Apple TV (3rd generation) with no remote

 I'm going to save you a lot of Googling and tell you how to do this right. I bought an Apple TV 3rd generation off eBay with just a power supply, as there were plenty of articles saying you can do this without a remote. You can, but it sucks.


Crucial materials:

  1. Apple TV and power cord
  2. Bluetooth keyboard or an app like Typeeto for Mac that lets your laptop act as one
  3. HDMI cable 
  4. Ethernet cable
  5. USB-A cable with a mini-USB end

Step 1 (restore if needed): Connect Apple TV to power and to TV via HDMI. If your Apple TV won't boot up or boots with an error message, then you need that USB cable. Detach the HDMI cable and plug in the USB (keep the power cable plugged in). Plug it into your Mac. If you have the MacOS that no longer has iTunes (but has TV / Music /Books separate apps) then go to Finder. The Apple TV should appear in the sidebar. When you click on it, you should have a restore option. Click it. It takes a few minutes.

Step 2 (setup Apple TV) You need the power cable, ethernet, and HDMI connected to the Apple TV (and connect the HDMI to your TV). Power it on. This is where you need a Bluetooth keyboard. After installing Typeeto on the Mac, I was able to use my computer as a Bluetooth keyboard and to connect to the Apple TV. This way, I was able to get through intro menus about language, etc. 

Step 3 (get Apple TV on your wifi network) At this point, just unplug the Ethernet cable and use your Bluetooth keyboard to find the Network settings and put in your wifi password

Step 4 (setup your iPhone or iPad as a remote) Once your iPhone or iPad are on the same wifi network, you can set them up to be remotes for the Apple TV. Follow the steps in this Apple post about adding Apple TV remote to your device's Control Center. Then you'll need the Bluetooth keyboard to enter the 4-digit passcode to pair the two devices.

At this point, your iPhone or iPad can navigate the Apple TV! Congrats!

DIY Project Pride - a Garage Door Open Indicator

 I can't remember the last time I wrote a real post, so here's one about a fun DIY project to solve a problem - an indicator light for when you leave the garage door open.

Materials:

  • Magnetic reed switch ($12 at Home Depot)
  • Speaker wire (approximately 20 gauge)
  • Small wire caps 
  • Electrical tape
  • Leftover corner braces
  • Metal strapping
  • Machine screws with matching nuts
  • A few sheet metal screws
  • An old 5V iPod charger (30-pin) with power adapter
  • An extension cord
  • One two-wire LED (your choice of color) - you can get a 100-pack for $5

I started with the switch, which is on when the two magnetic parts are close. I used sheet metal screws to fasten one part to the top of the garage door. Then I used the corner brace and metal strapping to attach the other half to the roof of the garage where it aligns with its partner when the door is open. (This means the LED will light when the door is fully open, but not partially open). 


From here, the speaker wire runs along the garage roof. I ran low on one piece, and had to splice it to another. I always tape over the wire nuts to keep the wires from pulling out!


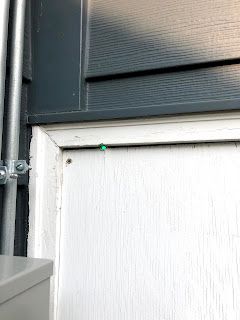
The wires split after this, with one running to the LED, the other to the power supply. A third wire connects the other post on the LED to the other wire on the power supply. Below you can see where I drilled the hole to push the light through to the outside.

Here's the type of LED I used:


Here's the wire nuts where I spliced the power from the USB cable to the wires going up to the LED and back to the switch. In a USB cable, you have four *tiny* wires. The green and white are for data and aren't used for this project. Red is positive (power) and black is negative. It doesn't matter which one goes to the LED or switch first.


Here's where the 3' power supply cable ran out of length and I used a spare extension cord. 


Here's a non-electrician's diagram of the wiring. It's all lower power so you can't hurt yourself. The hardest part is stripping the USB power supply wiring, which was wrapped in foil and then the wires were so small my wire stripping tool would often cut the entire wire. I also double over the stripped wire to make it fill up the wire nut and stay connected.

Now, when the garage is open, the light is green!